Description
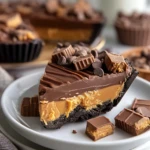
If you dream about Reese’s, this Giant Reese’s Peanut Butter Cup is your ultimate dessert fantasy: a no-bake chocolate cookie crust, a thick layer of silky ganache, and a fluffy peanut butter cheesecake filling crowned with a glossy chocolate drip and a pile of peanut butter cups. It’s impressive enough for holidays and birthdays but easy enough for any time you need a show-stopping sweet. This over-the-top treat is perfect when you’re craving easy dessert ideas, indulgent party food, or a fun twist on classic peanut butter and chocolate. Serve it as a make-ahead centerpiece for gatherings, add it to your weekend baking plans, or keep it sliced in the fridge for quick dessert, snack, or late-night treat inspiration.
Ingredients
2 1/2 cups chocolate sandwich cookie crumbs
6 tablespoons unsalted butter melted
1/4 teaspoon fine sea salt
1 cup semi sweet chocolate chips
1/2 cup milk chocolate chips
3/4 cup heavy whipping cream
16 ounces cream cheese softened
1 1/4 cups creamy peanut butter
1 1/2 cups powdered sugar
1 teaspoon vanilla extract
1/4 teaspoon fine sea salt
1 1/4 cups heavy whipping cream cold
1 1/2 cups mini Reeses peanut butter cups chopped
1/4 cup chocolate curls or shavings optional
Instructions
1. Prepare a 9 inch deep dish pie plate or springform pan by lightly greasing the sides and lining the bottom with parchment paper if using a springform.
2. Crush the chocolate sandwich cookies into fine crumbs using a food processor or by sealing them in a zip top bag and crushing with a rolling pin.
3. In a bowl combine the cookie crumbs, melted butter, and fine sea salt until the mixture looks like damp sand and holds together when pressed.
4. Press the crumb mixture firmly into the bottom and slightly up the sides of the prepared pan, using the bottom of a measuring cup to pack it tightly. Chill the crust in the refrigerator while you make the ganache.
5. Place the semi sweet and milk chocolate chips in a heatproof bowl.
6. Heat the heavy whipping cream in a small saucepan over medium heat until it just begins to steam and tiny bubbles appear around the edges but do not let it boil.
7. Pour the hot cream over the chocolate chips and let it sit undisturbed for 2 to 3 minutes.
8. Whisk the mixture gently from the center outward until the chocolate is completely melted and the ganache is smooth and glossy.
9. Reserve about 1/3 cup of the ganache in a small bowl for the drip topping later and keep it at room temperature.
10. Pour the remaining ganache over the chilled crust and spread it into an even layer, then refrigerate for 20 to 30 minutes until just set.
11. For the peanut butter cheesecake, beat the softened cream cheese in a large mixing bowl until completely smooth with no lumps.
12. Add the creamy peanut butter, powdered sugar, vanilla extract, and fine sea salt to the bowl and beat until thick, creamy, and well combined.
13. In a separate chilled bowl whip the cold heavy whipping cream to stiff peaks using a hand mixer or stand mixer.
14. Gently fold the whipped cream into the peanut butter mixture in two or three additions, using a spatula and turning the bowl so you keep as much air in the filling as possible.
15. Spoon the peanut butter cheesecake filling over the set ganache layer and smooth the top with an offset spatula, pressing the filling into the edges of the pan to remove any air pockets.
16. Cover the pan and refrigerate for at least 6 hours or preferably overnight until the filling is firm enough to slice cleanly.
17. When you are ready to decorate, gently warm the reserved ganache in the microwave in very short bursts of about 5 seconds, stirring between each, just until it is pourable but still thick.
18. Run a knife around the edge of the pan if using a springform, then remove the outer ring and transfer the pie to a serving plate.
19. Pour the warmed ganache around the outer edge of the chilled pie, nudging small amounts over the border with a spoon to create drips down the sides, then spread the remaining ganache over the center.
20. Immediately scatter the chopped mini Reeses peanut butter cups over the top, pressing them lightly into the ganache so they adhere.
21. Add chocolate curls or shavings over the candy if using for extra texture and a bakery style finish.
22. Chill the dessert for another 20 to 30 minutes to set the topping before slicing with a sharp knife warmed under hot water and wiped dry between cuts.
Notes
For the best texture, use regular creamy peanut butter, not natural or oil separated styles, which can cause the filling to become grainy or loose.
Make this a day ahead so the layers have plenty of time to set; an overnight chill gives you the cleanest slices and lets the chocolate and peanut butter flavors fully develop.
- Prep Time: 35 minutes
- Cook Time: 5 minutes
- Category: Dessert
- Method: No Bake
- Cuisine: American
Nutrition
- Serving Size: 1 slice
- Calories: 720
- Sugar: 48
- Sodium: 420
- Fat: 52
- Saturated Fat: 26
- Unsaturated Fat: 23
- Trans Fat: 1
- Carbohydrates: 60
- Fiber: 3
- Protein: 11
- Cholesterol: 120
Keywords: giant reeses peanut butter cup, no bake cheesecake, chocolate peanut butter dessert, easy dessert, party dessert, make ahead dessert