Store bought ornaments can be lovely, but a full box adds up fast, and they rarely feel personal. Handmade ornaments solve both problems.
Air dry clay is one of the easiest materials for DIY Christmas ornaments. It needs no oven, it costs a few dollars for a big block, and the white finish looks clean and modern on any tree. A single 2 pound block makes roughly two dozen ornaments, depending on size.
It is late October, which is perfect timing. Clay needs a couple of days to dry, so starting now means a relaxed batch before the tree goes up. Here is everything you need and how to do it step by step.
What You Need
- White air dry clay (a 2 pound block)
- A rolling pin and parchment paper
- Two paint stirring sticks or thin rulers, about 1/4 inch thick, as rolling guides
- Cookie cutters in simple shapes like stars, hearts, circles and trees
- Texture tools: fresh pine sprigs, lace, leaves, rubber stamps or a fork
- A drinking straw for hanging holes
- A small cup of water and a soft brush
- Fine sandpaper or a sanding sponge (220 grit)
- Acrylic paint in gold or white, plus a small detail brush (optional)
- Clear matte sealer (optional)
- Natural cotton string, thin ribbon or twine
The whole setup usually comes in under $20, and most kitchens already have the rolling pin and cutters.
Step by Step: Make Clay Ornaments
1. Prepare Your Space
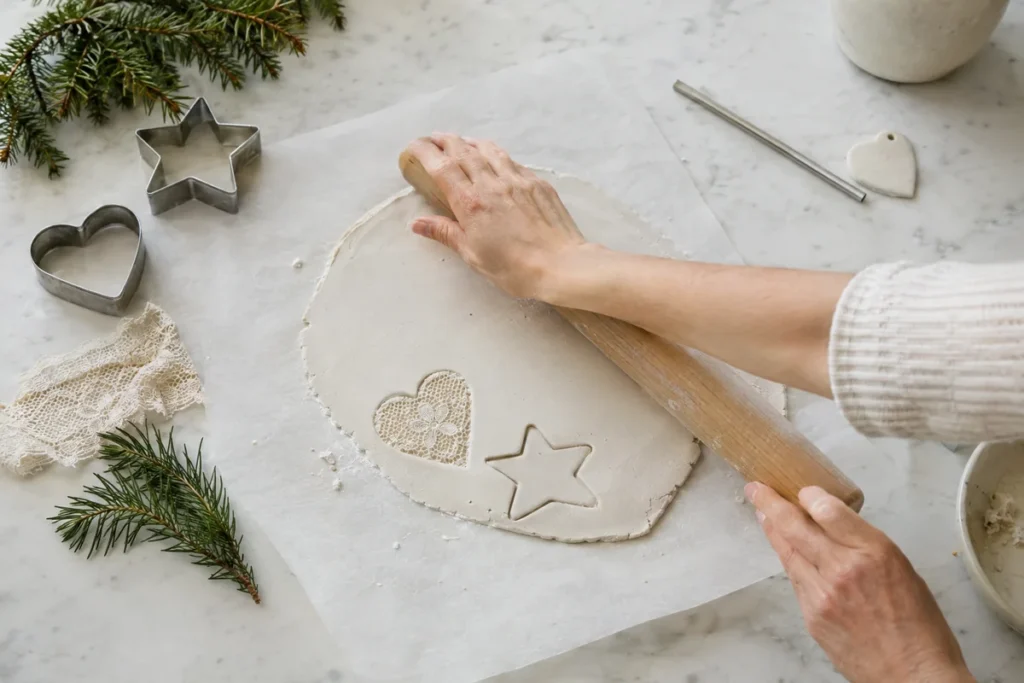
Lay a sheet of parchment over a clean counter. Air dry clay can stick to bare stone and is easier to lift from parchment. Keep the unused clay wrapped tightly in plastic so it does not dry out while you work.
2. Roll It Even
Knead a fist sized piece of clay until it is soft. Place the two stirring sticks on either side and roll the clay between them so it ends up an even 1/4 inch thick. Even thickness is the secret to ornaments that do not crack or warp.
3. Add Texture
Press a sprig of pine, a piece of lace or a leaf into the clay, then roll over it once lightly and lift it away. The imprint stays sharp and pretty. Rubber stamps also work, pressed straight down without rocking.
4. Cut Your Shapes
Press the cookie cutter straight down, wiggle gently, and lift. Peel the extra clay away from around the shape rather than lifting the shape itself. Gather the scraps, keep them wrapped, and reroll them for more ornaments.
5. Make the Hanging Hole
Push a drinking straw through the clay about 1/4 inch from the top edge. Too close to the edge and the clay can break when you hang it.
6. Smooth the Edges
Dip a fingertip or soft brush in water and run it lightly around each edge to smooth rough spots. Use very little water, since soggy clay cracks as it dries.
7. Dry Slowly
Leave the ornaments on the parchment in a cool, dry room away from heaters. Flip them every 12 hours so they dry evenly and stay flat. Most need 24 to 48 hours, and thicker pieces may need a little longer.
8. Sand and Finish
Once completely dry and pale all the way through, gently sand any rough edges with 220 grit sandpaper. Wipe away the dust with a dry cloth.
Safety note: Air dry clay is a craft material, not food. Supervise young children, keep small pieces away from toddlers, and wash hands after working with clay and paint. Sand outdoors or wipe dust with a damp cloth rather than blowing it around.
Ways to Decorate Your Ornaments
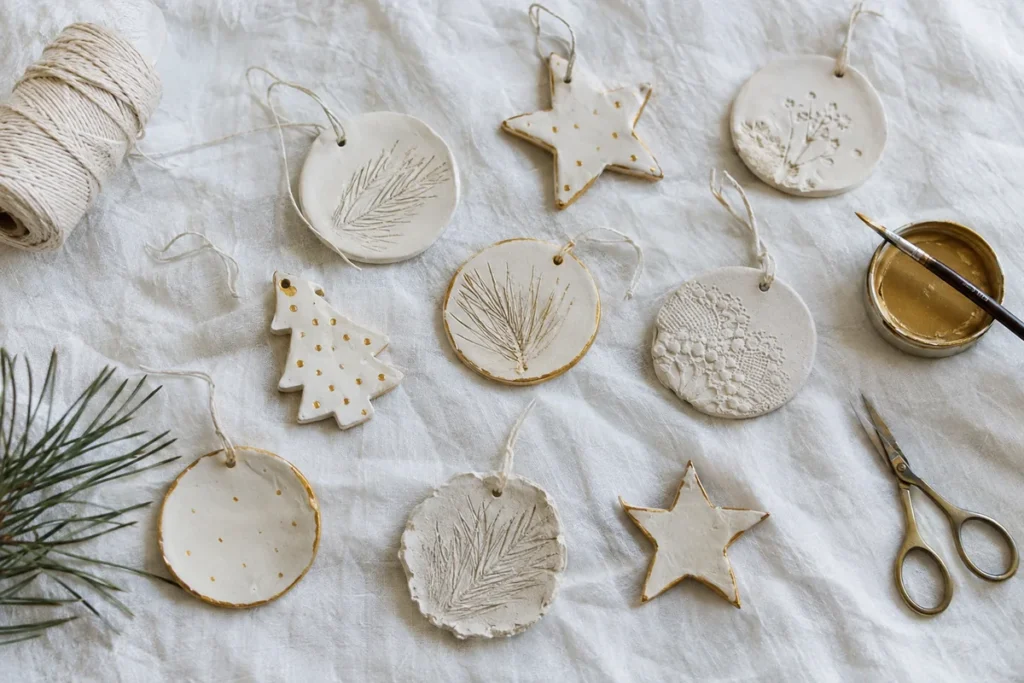
Plain white clay with a pressed pattern is beautiful on its own. If you want a little more, try one of these:
- Gold edges: run a small brush with gold acrylic paint around the outside edge only.
- Dipped finish: dip just the bottom third of each ornament in white or gold paint.
- Simple dots: use the end of a paintbrush handle to add tiny dots in a ring or a heart.
- Soft color: paint ornaments in sage, blush or pale gray for a tree with a gentle palette.
- Natural string: thread cotton string or thin linen ribbon through the hole and tie with a simple knot.
If the ornaments will be handled by kids or stored for years, a light coat of clear matte sealer helps protect the surface and keeps paint from flaking.
Ornament Ideas Beyond the Tree
- Gift toppers: tie a clay star onto a wrapped present instead of a bow.
- Place cards: a small heart at each seat adds a personal touch to a holiday table.
- Window garland: string a row of stars on cotton cord and hang it across a window.
- Handprint keepsakes: press a child’s hand into a larger circle of clay and dry it the same way. Write the year on the back with a fine marker once dry.
Fixing Common Problems
- Cracks while drying: the clay was too wet or dried too fast. Fill small cracks with a dab of wet clay, smooth it and let it dry again.
- Curling edges: flip the ornaments more often, or lay a flat sheet of parchment and a light book over them once they are mostly dry.
- Uneven thickness: use rolling guides every time. It makes the biggest difference.
Storing Your Ornaments
Wrap each ornament in tissue paper and store them flat in a sturdy box away from damp basements and hot attics. Air dry clay softens if it gets wet, so keep it away from humidity.
Homemade clay ornaments are simple, calm and personal. Make a batch this weekend, let them dry while life carries on, and by the time the tree goes up you will have a set that is completely your own.
What shapes are you making for your tree this year, and will you keep them plain white or add a little gold? Tell us in the comments.
Quick Questions
How long does air dry clay take to dry for ornaments?
Most 1/4 inch ornaments dry in 24 to 48 hours. Flip them twice a day and keep them away from heaters so they dry evenly without cracking.
Can I bake air dry clay to speed it up?
It is better not to. Heat can cause cracks and warping. Patience gives smoother, flatter ornaments. If you want a bakeable option, use polymer clay and follow its package directions.
Do I need to seal air dry clay ornaments?
Sealing is optional, but a clear matte sealer protects them from moisture and handling. It is a good idea if the ornaments will be stored for years.
Is this a good craft for kids?
Yes, with supervision. Kids love rolling, cutting and pressing patterns. An adult can handle the sanding, and everyone should wash hands afterward.